With a fresh coat of paint and a set of stunning new decals, Clara is truly cleaning up nice. Uncovering all her bare metal is delicate work, but it makes such a nice contrast against the black enamel. I started with the flywheel cover, since these areas will be covered by the bobbin winder. I figured I’d practice somewhere invisible before taking a razor blade anywhere near her badge or serial number.

I’m glad we were so careful with applying tape; the enamel itself is pretty tough, but the clear coat seemed more brittle. Next time I’ll block the tiny screw holes better, though. We left the smallest holes open to get smooth edges, but the screws are milled to such fine tolerances that the slight thickening from the paint was noticeable. I had to carefully slice around the edges of the screw holes so that the screw shifting the enamel on the inner edges didn’t fracture it too badly.
The badge and plates polished up beautifully. I had no idea that the badges started off this light; I’ve only ever seen them tarnished to a much more coppery color. The old trademark has much more style than the newer ones, I think. I might be biased because our mark is crossed sewing tools with a spool of thread too, but this sort of design was very popular in the late 1800s, and I think it’s a good one.

The boat shuttle reminds me I have to take a look at Rania – she’s old enough to have a shuttle, not a bobbin, which is new to me. One day I’ll clean her up like this but I won’t repaint her. Fortunately her decals are in much better condition than poor Clara’s were. I have two more sets of decals for 66’s, and I’m pretty settled on doing over Bea and Elizabeth with them. Those are the two machines that I sew on all the time, and although both work beautifully, they have quite a bit of wear. I originally thought to do Dorothy and Elizabeth, but under all the dust and grime Dorothy actually has less wear on her paint than Bea does. She’s missing some parts and is rusted (and gunked up) stiff, though.
Clara was pretty stiff when I got her too, although her wheel did turn a bit. She and Bea came as a package deal, and as Bea was in better shape I brought her to working order and set Clara aside at first. In putting her back together, I remembered why she had been set aside – a few of her smallest bits were broken or missing, like her take-up tension spring. I hunted around for an hour or so before realizing that it wasn’t missing but still just where it belonged (the identifying bit broken off, and the rest hiding in the tension assembly).

That wasn’t the only thing gone; she’s missing some felt and a screw, too. This piece of felt goes around the bobbin race and keeps it oiled, and it’s very common to find it wholly (or partially) removed, usually by someone pulling at it. It’s fitted into a spring screw, and Clara’s, like many others, looks like it was pried out by someone trying to clean it and mistaking the red felt for lint. The remains of the felt are still in the spring screw, compacted and coated in years of oil and nearly impossible to winkle out. Forty minutes of trying to winkle it out with pins, pliers, and a razor blade only netted me these teeny scraps. I eventually resorted to burning it out with a lighter. I ordered parts for her and a new plate for Dorothy; when I get them I can cut a new felt shape and load this part back up before assembling the lower mechanisms.

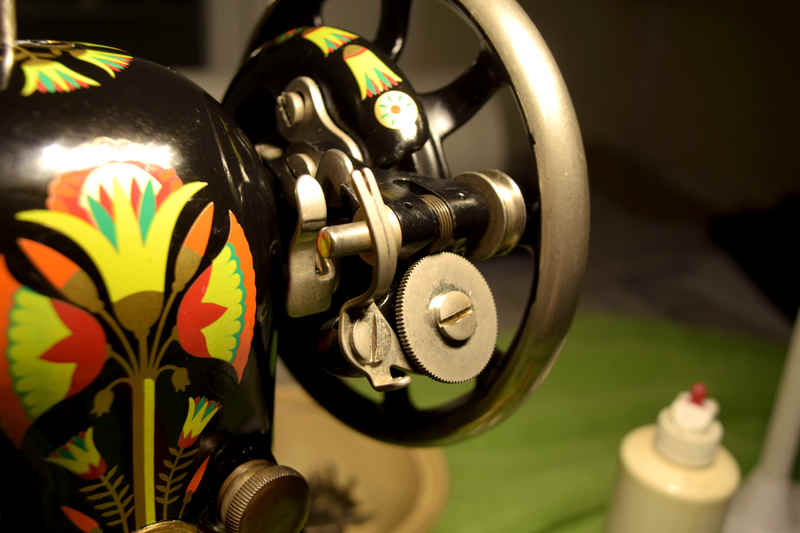
I was stymied on the tension assembly (the first part I tried to reassemble) and figured I’d do the bobbin and feed dogs when I got in my new parts, so I took the leap and put together the bobbin winder first. It’s a finicky mechanism because three tiny springs are held under tension, but the clockwork is neat, and when they work well they are very cool to see. There’s a cam underneath the large gear, and the screw to the right of it holds a little arm that follows the cam and makes the thread guide rock back and forth like a very slow metronome.

The bobbin winder, assembled and mounted. The most difficult spring was the one that sits under the mount to the flywheel cover – the others weren’t too bad. That one holds it down when it is engaged, and the third pops it back up when the bobbin is full.
I’ve got a video of Bea’s in action, but I’ll have to take a video of Clara’s all brightened up for you guys too. I was planning on taking a couple videos once she’s rebuilt and her timing set, anyway. I’m spoiled; the old machines are so much quieter and smoother than modern ones. Without a motor Clara will be the quietest of the bunch. I haven’t put a machine in the treadle table yet, but working the treadle on its own is far quieter than a motor.
The treadle itself was a little strange to learn but fun to use, once I got the hang of it. I’m used to treadling with just my right foot because of my spinning wheels (which are both the bulky traditional ones, not the modern fold-up ones with double pedals). The Singer treadle tables are meant to be used with both feet; the right up at the top corner and the left down at the bottom corner. Alternating presses mean that no movement is wasted, and the load is more balanced between your feet. You could sew for hours without getting tired. I hope so, anyway – I’m sure I’ll find out soon!